
You can have perfect aim and the steadiest hands, but if your shoulder position is off, your shot will fall apart.
I’ve seen countless archers struggle with fatigue, collapsing shoulders, inconsistent anchor points, and sloppy release execution, all stemming from improper shoulder positioning. The solution isn’t complicated, but it requires you to understand what the proper position feels like and how to recognize when things are off.
Today, I’ll break down the mechanics of proper shoulder position, explore how it affects your entire shot process, and explain how to build this fundamental skill into your shot routine.
Understanding Proper Shoulder Position
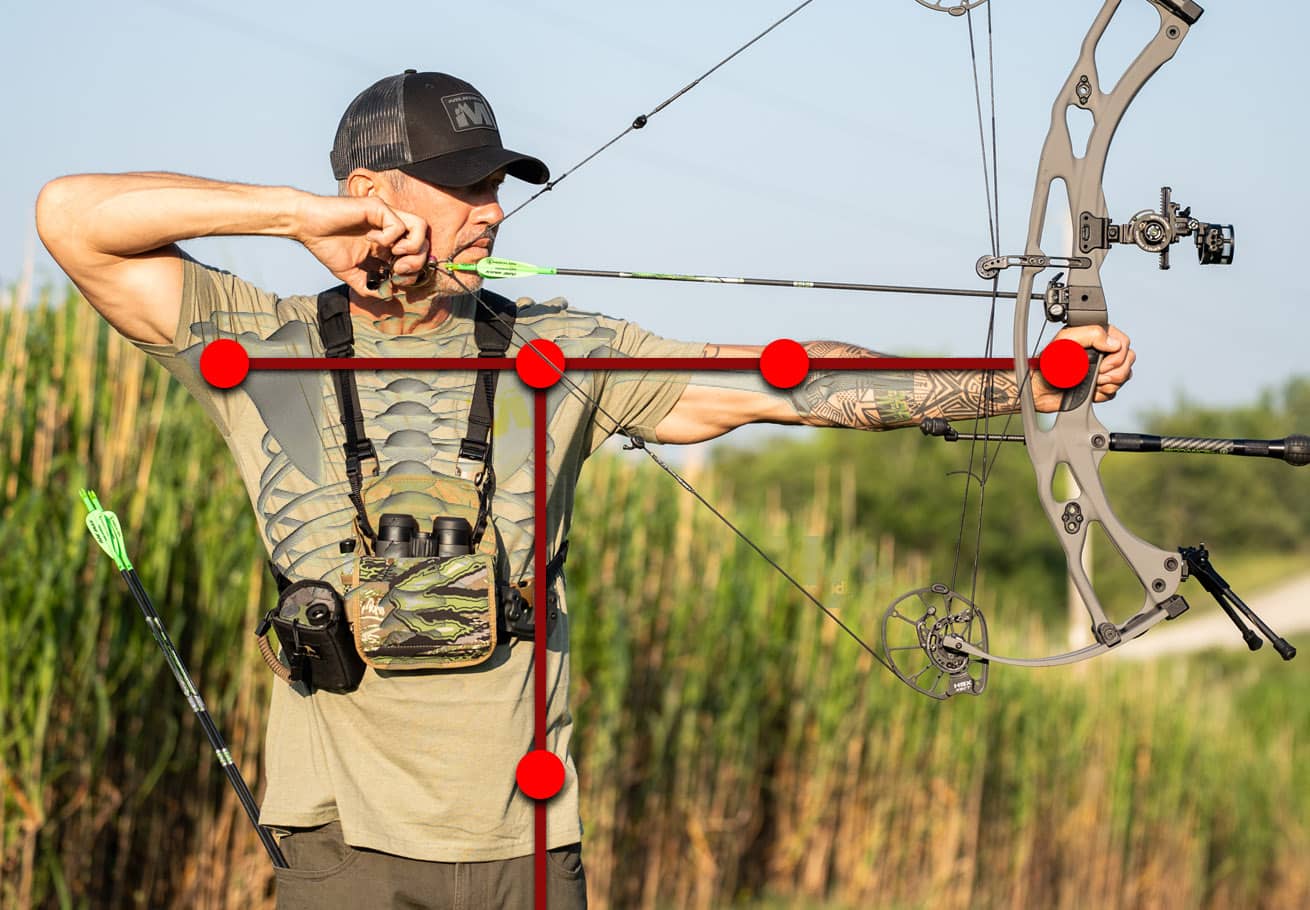
Your front shoulder needs to be down and forward.
Sounds simple, but here’s where most archers go wrong: they overcomplicate the process by drawing and immediately driving their shoulder back or up, compromising their position before they even start the shot sequence.
When you stand naturally and raise your arm toward a target, your shoulder organically sits in that perfect down-and-forward position. Problems happen when we start overthinking it. You want the front half of your body to look like a “T” formation. That’s perfect archery form! If I asked you to make a “T” with your body you would stand with your hands at your side then just raise them to level with the shoulder. I would say PERFECT!
Here’s where the problem lies: most people don’t do that when they have a bow. Instead, they may… arch back, draw sky high, bend the elbow to PUSH PULL, “Lock In” the shoulder… the list goes on and on. We are complicating the “raise to a T and draw back” principle.
I can feel when things are off in my own shot: either the telltale pressure of the humerus riding too high, the trap muscles tensing against my neck, or that uncomfortable sensation of my scapula pressing against my spine.
Proper shoulder position enables free movement in your rear scapula, the ability to generate and maintain back tension, and most importantly, the capacity to pull through your shot with proper form.
Shoulder Position’s Role in Shot Execution
Good shots often feel effortless. When your shoulder position is compromised, you’ll find yourself fighting the shot — holding, straining, or feeling like you’re pulling the bow in half. YOU WOULD SWEAR IT!
The reality is that your front shoulder is creeping up or back, causing your arrow to subtly move forward. You’re giving with the front shoulder while taking with the rear arm, creating a tug-of-war that gets you nowhere. If your shoulder isn’t holding its ground then it’s like you’re just slipping in the mud while your counterpart tirelessly pulls harder on the bowstring. The result is a forced shot and one step closer to target panic.
This is especially apparent when shooting a tension release or working with back tension. The front shoulder stays solid down and forward while you build pressure on the release for a PERFECT SURPRISE BREAK. With proper shoulder position, your shots break clean and easy. But when that shoulder creeps up or rolls back, you end up in a wrestling match with your release.
If you feel tension in your neck or the uncomfortable pressure of your scapula against your spine, you’re not in an optimal position for shot execution. These physical cues are your early warning system. The moment you feel that tension building on the left side of your neck (for right-handed shooters) or your shoulder blade pressing back, you’re working against yourself.
Implementing Proper Shoulder Position
The process of setting your shoulder position starts before you raise your bow.
I begin by checking my stance and grip. Then I consciously shift a little weight to my front foot. At this point, I’m tipping the shoulder down slightly, deliberately elongating and relaxing my front shoulder in that down-and-forward position.
Here’s my step-by-step process:
1. Starting Position and Initial Relaxation
With your bow at rest, let that front arm completely relax. Use your stabilizer or cam as a resting point — this maintains stamina throughout a shooting session.
I never hold tension between shots. That front side needs to fully relax: traps, rhomboids, lats, everything down and forward.
2. Pre-Draw Setup
Start by checking your stance and grip. Then shift your weight to your front foot and tip down slightly.
This helps you elongate and deliberately relax your front shoulder into that down-and-forward position. Make sure your front shoulder is directly over your front foot.
3. Raising and Drawing
Stand tall with confident posture — “shoot proud,” don’t “shoot small.” From your relaxed position, raise the bow toward the target while maintaining that natural shoulder alignment.
As you draw your release hand back to your face, keep that front shoulder settled down and forward. Keep it in line with your front foot throughout the draw cycle.
4. Monitoring and Adjusting
If at any point during your shot process you feel that shoulder creeping up or back, let down and cancel the shot. Don’t try to muscle through it — that’s a recipe for inconsistency.
WARNING SIGNS- There are some things that red flag poor shoulder position. Watch for tension in your neck or pressure between your shoulder blades. If your shoulders ache between sessions or you start to suffer from neck impingement then these are signs you need to reset. Don’t worry about powering through. Focus on building a proper form you can replicate shot after shot.
Final Tips on Your Shoulder Position
Proper shoulder position isn’t just another item on your shot checklist. It’s a fundamental building block that affects every aspect of your shot execution.
When you get it right, you’ll find your anchor points more consistent, your release cleaner, and your accuracy improved. Most importantly, you’ll shoot longer sessions with less fatigue and better results.
Be patient though. This body part is so complex but also weak at first. Building some new stability muscles will take time. So if you figure out you’re slipping and creeping then be confident it will get better every day! Scapular stretch is something you build with time. Once you have, you’re unstoppable in proper archery technique.
Start by practicing these concepts at close range. Focus on feeling the correct position rather than worrying about where your arrows hit. Remember, stability comes with patience. Don’t be afraid to take extra time between shots or limit yourself to just a few good shots before resting. Quality repetitions build proper muscle memory.
Your shoulder position shouldn’t feel like a struggle. If you’re fighting to maintain proper form, you might be pulling too much weight or need to focus more on building up your shooting stamina. Take your time, trust the process, and watch how this fundamental improvement transforms your entire shot sequence.

Man, I absolutely love your content! It’s always so helpful. Thank you for all you do!
These instructions are great. I have been shooting a bow for 50years and 48 of those years were wrong. But stumbling on Nock On. Archery a few years ago it has got me on the path and at 82 years old II shoot better now than at 32 years old.. Thank you John Dudley