
There’s a reason why I’ve trusted a Bitzenburger jig for decades when fletching my arrows—precision and consistency. When you’re putting in the work to build custom arrows, the last thing you want is variation in your fletching process. That’s exactly why I’m excited to announce that we’re now offering the Bitzenburger fletching jig at Nock On Archery, but with a critical difference that sets ours apart from what you’ll find elsewhere.
We’ve gone the extra mile for archers who ask what fletching setup I personally use. Instead of just selling you a jig and letting you figure it out, we open each box and dial in the exact angles and presets that I use on my own arrow fletching configurations for both target archery and hunting. This means you’re getting a professional-grade fletching tool that arrives ready to produce arrows to my specifications right out of the box.
The Nock On Difference: Pre-Configured Fletching for Proven Performance
The fletching jig we’re offering comes preset in a 4-fletch configuration with a substantial offset using the right-wing helical clamp included in the box. This isn’t some random fletching setup. It’s the exact configuration I’ve refined through years of competition and hunting.
While the jig remains fully adjustable (more on that below), having it pre-configured saves you considerable time and experimentation. For all the archers who’ve asked, “John, what fletching setup are you shooting?”…. this is your answer in physical form.
Inside the box, you’ll find everything needed for successful fletching:
- The main jig body
- The precision clamp
- Allen wrenches for adjustments
- Original manufacturer instructions
This simplicity is part of what makes the Bitzenburger so effective for fletching. There’s nothing complicated to figure out, just rock-solid consistency and precision.
Understanding Your Fletching Jig’s Adjustment Points
While our pre-configured setup works exceptionally well for most archers, understanding how to adjust your fletching jig gives you complete control over your arrow building. There are two primary adjustment areas you should know about:
1. Vane Angle Adjustment for Optimal Fletching
The two main dials on the angled arm can be adjusted using the provided Allen wrench. These control the angle of the clamp, which affects:
- How well the vane conforms to the shaft diameter
- The degree of offset or helical twist in your fletching
A proper angle ensures the entire base of the vane makes solid contact with the arrow shaft for maximum adhesion. Our preset gives you a healthy offset that provides excellent stability without sacrificing speed.
2. Fletching Configuration Options
Look at the nock receiver (where the back of the arrow sits), and you’ll notice three small set screws. These control the indexing that determines your fletching pattern:
- Top screw: 120-degree spacing for a traditional 3-fletch configuration
- Middle screw: 90-degree spacing for a balanced 4-fletch setup (our preset)
- Bottom screw: 75/105-degree alternating pattern for specialty applications
To change configurations, simply back out the current set screw until it’s flush with the housing, then gently tighten the desired configuration’s screw. You want just enough tension to hear the “click” confirmation when rotating, but not so tight that it prevents smooth turning.
Professional Fletching Techniques
Getting consistent, professional results comes down to attention to detail in your fletching process. Here’s how to achieve that with your Bitzenburger:
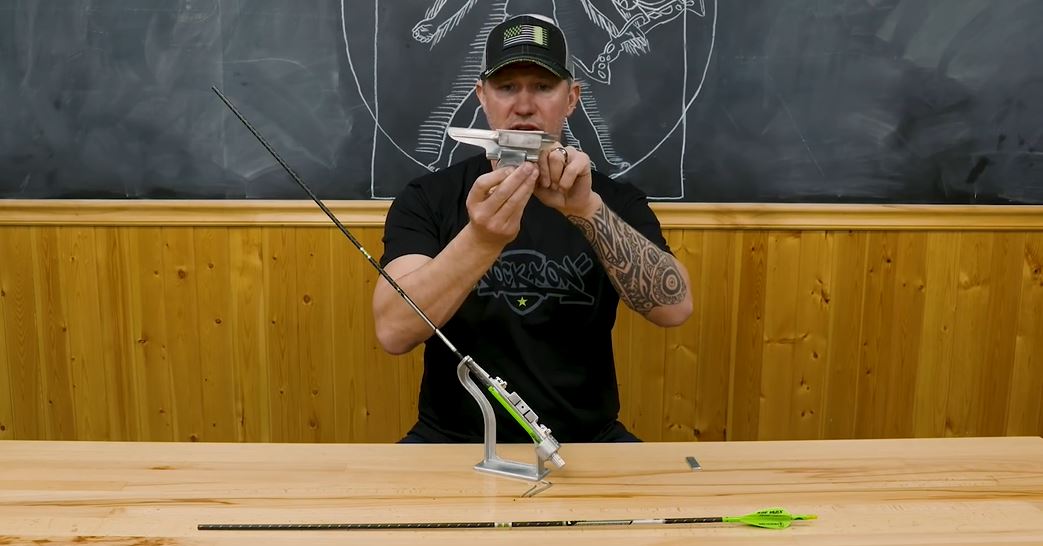
First, remove the small plate attached to the magnets on the jig body. This allows your clamp to attach properly during the fletching process.
When placing your arrow in the jig, make sure the nock’s string slot aligns with the small V-notch in the jig’s receiver. This ensures proper orientation throughout the fletching process.
For the vane itself, place it completely flush in the clamp — not lifted or angled on either end. This is crucial for proper adhesion and aerodynamic performance. As you build arrows, you may notice glue buildup on the clamp. One advantage of the Bitzenburger’s metal construction is that you can gently scrape away this residue with a dull knife to maintain precision fletching.
Consistent placement is key, so use reference points to ensure each vane sits at the same position on the shaft. On our Nock On wraps, we’ve included a reference line to make this fletching even easier. I typically mark the corresponding tick on the clamp with a pen to maintain identical placement across all my arrows.
Fletching Best Practices:
- Always clean arrow shafts thoroughly before fletching
- Apply adhesive evenly along the entire vane base
- Allow proper drying time between fletchings (typically 3-5 minutes)
- Check for proper clearance with your bow’s rest and cables
- Test arrow flight after fletching before hunting or competition
Fine-Tuning Your Fletching Setup
If you want to check or adjust your jig’s angle for optimal fletching, here’s a practical approach: wrap an arrow with masking tape and adjust your clamp angle until the vane makes complete contact along its entire base, no gaps at the front or back. To visualize the exact offset or helical pattern you’ve created, place a vane in the clamp, mark along its edge with a pencil on the shaft, then remove the clamp to see the resulting angle.
This level of precision in your fletching is what separates adequate arrows from exceptional ones, and it’s exactly what we’ve built into each Bitzenburger jig we sell.
Why Quality Fletching Matters for Your Shooting
The consistency you can achieve with a properly set up Bitzenburger directly translates to tighter groups and more predictable arrow flight. When each fletching is positioned identically across your entire arrow set, you eliminate one more variable from your shooting equation.
For hunting situations where every detail matters, consistent fletching becomes even more critical. That last thing you want when drawing back on a trophy animal is wondering if inconsistent fletching might affect your arrow’s flight.
By starting with our pre-configured fletching setup, you’re building on a foundation that’s been proven in the most demanding competitive and hunting environments. You can always make adjustments for your specific preferences, but you’re beginning with settings that I personally trust when everything is on the line.
Whether you’re a seasoned arrow builder or just getting started with creating your own custom fletching, the Bitzenburger jig we offer at Nock On Archery gives you professional-grade results without the guesswork. It’s the same fletching tool and setup I rely on — now available to help you build arrows that perform to their absolute potential.


