
From the moment you address the bow until that arrow leaves the string, your bow grip makes the difference between consistently hitting your mark and wondering why your groups aren’t tightening up.
Grip position is the critical second step of our comprehensive shot sequence (the first is establishing proper foot placement). While many archers focus on advanced techniques like back tension or release execution, they often overlook this fundamental aspect that quite literally supports every other element of their shot.
Even slight variations in grip pressure or position dramatically affect accuracy. Whether it’s squeezing your fingers during the shot, applying too much heel pressure, or crossing that critical life line, each small deviation compounds into huge point-of-impact shifts downrange.
Today, I’ll explain exactly what makes a perfect bow grip, walking through the specific hand position and common pitfalls that hurt your accuracy. I’ll share the same technique I use in my personal shot routine and the key checkpoints I look for when coaching others.
The Anatomy of a Perfect Grip
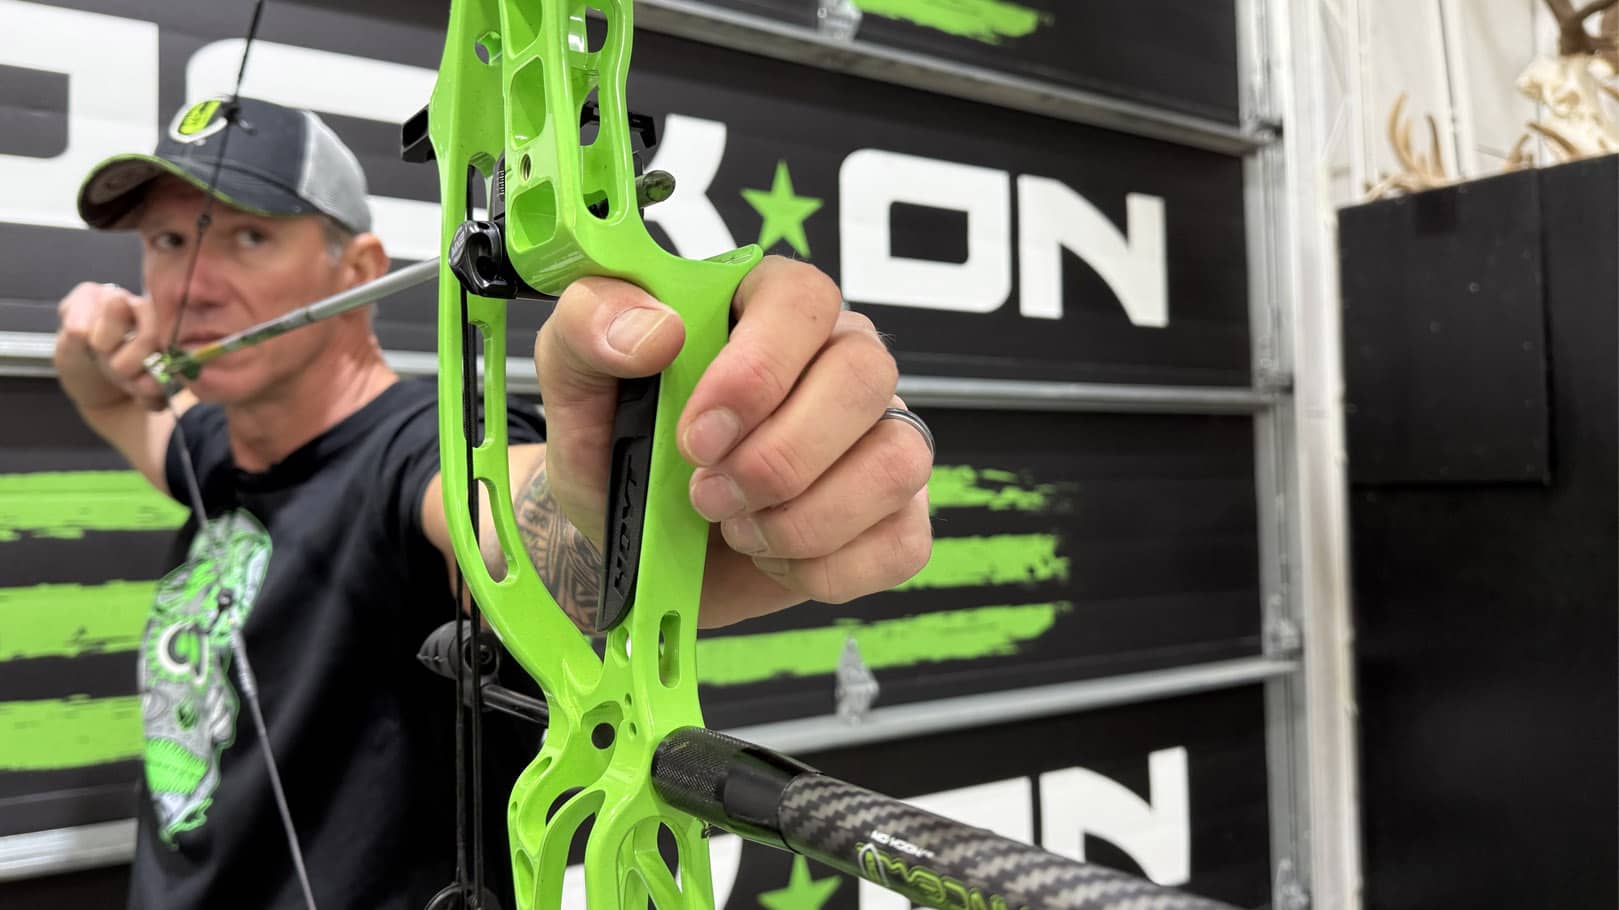
Establishing a proper bow grip starts with a natural, relaxed hand position. Think about how you’d naturally raise your hand to signal someone to stop. That’s the position we’re looking for.
 1")
This simple reference point immediately puts your thumb at an optimal 45-degree angle, creating the foundation for a torque-free grip that’ll support consistent accuracy. When your thumb naturally sits at this angle, your shoulder automatically aligns into the optimal position for drawing and holding.
Rotating your thumb too far up creates unwanted contact with the riser, causing your bow to lean. Go too far the other way, and you’ll end up with excess pressure from your index knuckle on the top of the riser, creating the opposite effect.
Perfect Pressure Distribution
Once that thumb position is dialed in, the next critical element is pressure distribution. You’re looking for even contact from the saddle of your grip hand right down to the pad of your thumb.
Many archers cross their palm’s life line. This is a mistake. Your bow should always stay on the life line’s thumb side.
 2")
Think of it like leaning against a door frame. You wouldn’t lean awkwardly on your fingertips or the heel of your hand — you’d naturally find that sweet spot where your weight distributes evenly. That’s exactly what we’re looking for in bow grip pressure.
When you nail this balance, you’ll feel a natural connection running from your hand through your arm and into your shoulder, creating a stable platform for consistent shooting that doesn’t rely on muscle tension.
The moment you start to actively grip or squeeze the bow, you introduce variables that hurt your accuracy. Remember, we’re looking for a position that lets your anatomy do the work, not your muscles.
Initial Hand Placement
Look down at your feet to confirm your stance, then transition your focus to your bow hand. With your release already attached to the string, you’ve got a free, relaxed bow hand to work with.
Use that “stop signal” position to find the 45-degree thumb angle we discussed. It should feel natural, without any forced rotation.
Once you’ve got that thumb angle set, slide your hand up until it hits the bottom of the shelf. This is critical for consistency. Any space between your hand and the bottom of the riser creates variable pressure points that hurt your accuracy.
Maintaining Position Through the Shot
Here’s where many archers derail their shot before it begins: they establish a perfect grip, only to change it during the draw cycle.
You might see someone grab their bow with tension, draw back, then try to relax into the correct position at full draw. By then, they’ve already introduced torque into the system, and their accuracy suffers dramatically.
Maintain that relaxed, properly positioned grip from the moment you address the bow until the arrow clears the rest. Start it right and keep it right! Otherwise, reset yourself to get it right before you draw. Keep your fingers loose — no gripping during the draw, no squeezing at full draw, and no grabbing after the shot.
Let your natural anatomy support the bow while maintaining that even pressure we established from the saddle to the thumb pad.
Wrist Angle and Draw Length
When your wrist angle varies, your effective draw length changes with it.
Think about it: if you’re shooting with a high wrist, your draw length will feel shorter than usual. You’ll compensate by leaning forward, bending your bow arm, or lifting your shoulder — all of which compromise accuracy and consistency.
 3")
By maintaining that natural, relaxed wrist position we established earlier, your draw length remains consistent shot after shot. This consistency is crucial not just for accuracy, but for proper form throughout your entire shot sequence. When your grip is correct, everything else falls into place.
Bringing It All Together
A perfect bow grip is your foundation for accurate shooting. Like any foundation, you’ll need to build it correctly from the ground up and maintain it throughout the entire shot process. Start with proper hand placement, maintain consistent pressure distribution, and let your anatomy do the work.
Remember these points for your practice sessions:
- Start with the 45-degree thumb angle (telling your bow handle to “stop” signal)
- Slide your cradle until you contact the bottom of the shelf
- Ensure even pressure from saddle to pad
- Keep your grip position relaxed throughout the shot
- Never change your grip during the draw cycle
Focus on these fundamentals during every practice session. The more ingrained these proper grip mechanics become, the more naturally they’ll flow into your shot sequence, leading to tighter groups and more consistent accuracy downrange.

Thanks…
Thank you, these new instructions are great. I cannot practice these just yet as I fell on the ice and the wrist is still sore and swollen. I can practice these using the practice string and grip I got from Nock On . I just have to say that John Dudley is fantastic. I am 82 years old and have been shooting a bow for 50 years and 47 of them I was doing wrong.. thank you
The picture of your stance is this correct
I’ve always known this process but you forget the importance of every little aspect . This is so helpful having it broken down step by step.
Always good to review the best shooting form to reconfirm, that form. I really like how John explains it, hand- wrist position . Thanks