Unboxing your first compound bow marks the beginning of an exciting new chapter. But how do you shoot it? More importantly, how do you keep from building bad habits you’ll have to unlearn later down the line?
Good archery comes from repeatable movements and proper body mechanics. Just like other sports, success comes from practicing the right techniques from day one.
Let’s break down what makes a great shot.
Stance: Your Shot Starts from the Ground Up
Your feet tell your brain everything about balance and stability. If you aren’t stable in your feet then your aim on target won’t be either. When your feet are positioned wrong, every other part of your shot falls apart. A proper stance sets up each shot for success.
Setting Up Your Stance
Line up your feet about hip-width apart. Put the ball of your back foot and the big toe of your front foot along a straight line that points to your target. Keep your weight balanced right over your feet, but slightly favoring the front foot will help prevent you from leaning back.
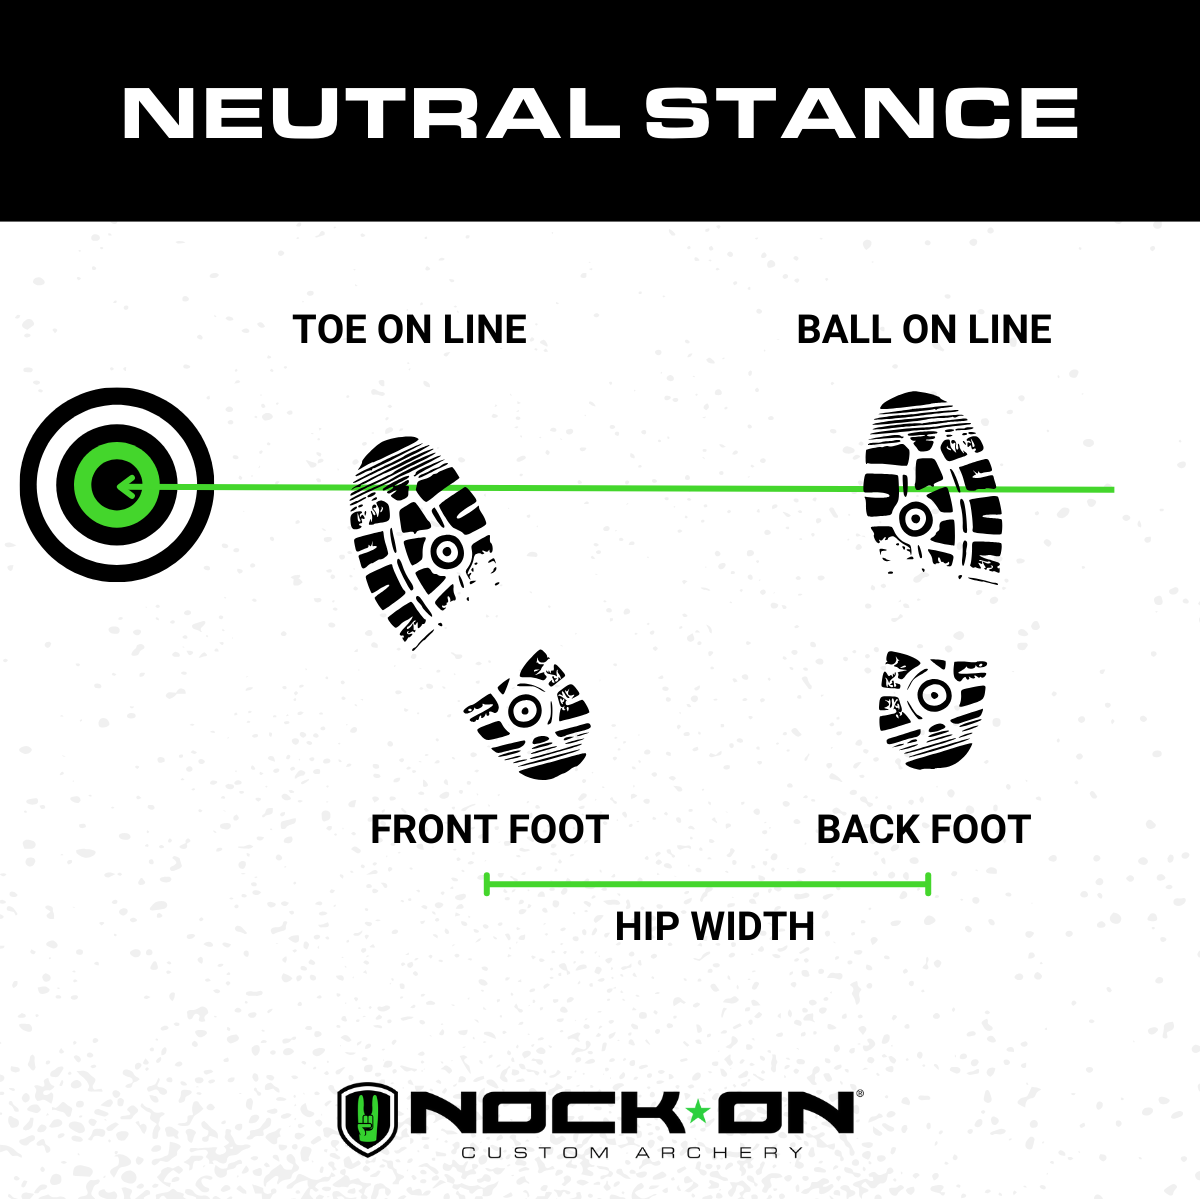
Your feet control more than just balance. They set up:
- How your shoulders line up
- Where your string runs during the shot
- How steady you can hold your anchor position
- Whether you can make the same shot twice
Think about your stance like building a house — the foundation has to be solid, or the whole structure will collapse. Your feet should be directly under your hips, which should be directly under your shoulders. This foundation starts from the ground and flows up through your body.
Holding Your Bow: The Right Grip
Many new archers grab their compound bow too tight, which throws off accuracy and makes consistent shots impossible. The secret is to have your grip pressure light and repeatable! Here’s how to hold your bow the right way…
Hold your hand up like you’re telling someone to stop using the most natural hand position possible. Your thumb should point at about 45 degrees and your fingers should be slightly bent — this comes naturally when you’re relaxed.
Now, let the bow’s grip rest against your hand, from the saddle of the thumb to where your thumb meets your wrist.
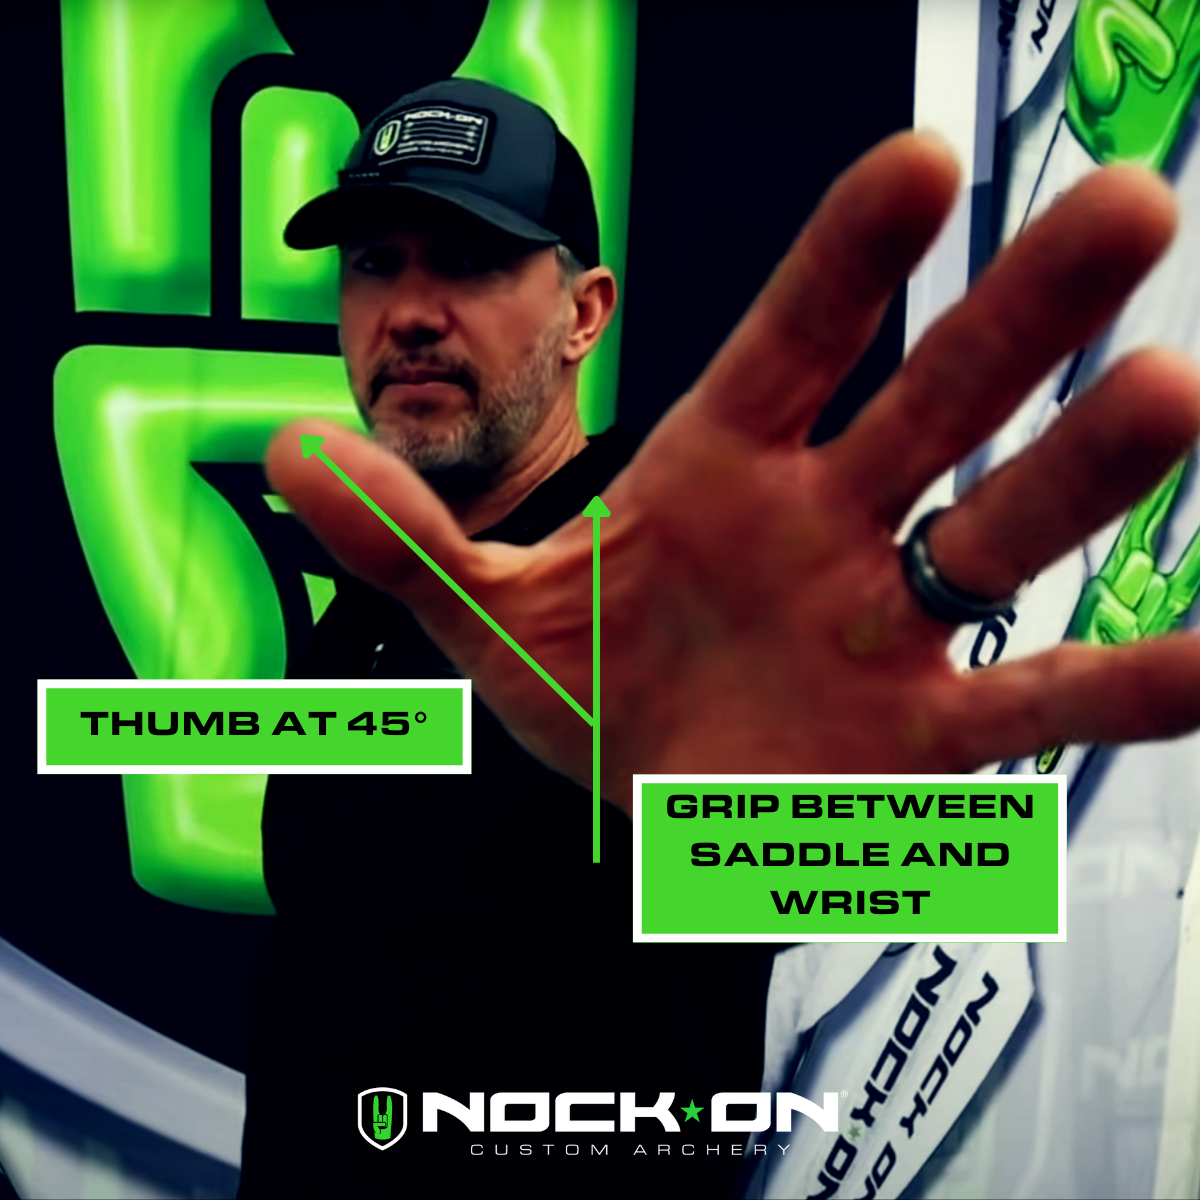
Think about casually propping yourself up against a door frame. You don’t grab the door frame tightly; you just rest your weight against it. Your bow hand works the same way. Let the bow sit naturally in a relaxed hand. No squeezing, no gripping, just resting. When done correctly, your skeletal anatomy is doing the work! Tension is the enemy!
What Makes a Bad Grip
You’ll know your grip needs work if:
- Your knuckles turn white from squeezing
- The bow jumps weirdly when you shoot
- Your arrows spray left and right
- Your hand gets tired quickly
Your grip should use the minimum muscle needed to keep the bow up. More muscle means more movement, and more movement means missed shots.
Each piece builds on what came before. You’re ready for the next steps once you nail down your stance and grip.
Take time with these basics. They make everything else work better.
Draw Technique and Anchor Points
Thinking about proper draw technique might feel overwhelming at first. But just like any other sport, breaking down the movement into simple, repeatable steps will help you build consistency.
Let’s talk about how to develop a strong, reliable draw technique that will serve as the foundation for all your shots.
The Mirroring Principle: Everything in Its Place
Think about your bow hand’s position — the thumb-up 45-degree angle you create when setting up your grip. Your release hand should mirror this same angle (with the thumb down) as you begin your draw.
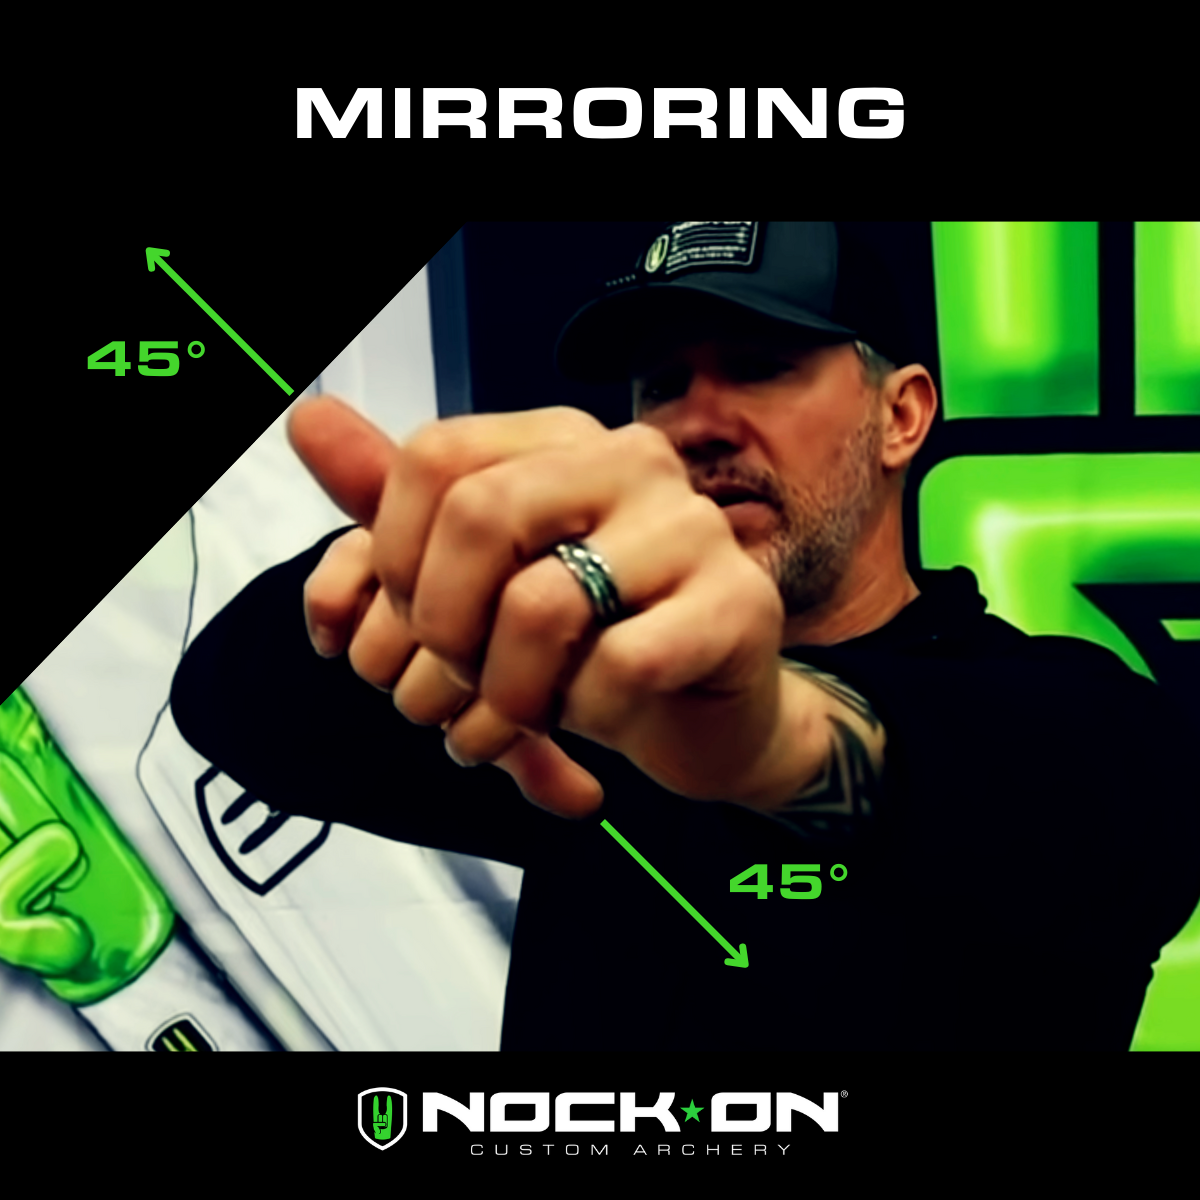
This “mirroring” technique sets you up for a smooth, natural drawing motion that puts everything in the right place once your bow is fully draw back. When both hands start at matching angles, your release hand naturally finds its way to the perfect anchor point without awkward adjustments.
The Drawing Process
Drawing your bow isn’t a feat of raw strength. It’s a smooth, controlled movement that positions everything correctly from the start.
Begin by raising both arms together toward the target, keeping your bow arm straight but not locked. Once pointed at the target, pull the string back towards. Think of this as one fluid motion rather than separate steps. It should be smooth just like the motions of a slingshot.
Your draw should feel like you’re pulling a barn door closed behind you, not like you’re trying to start a lawnmower. Keep your front shoulder down and relaxed as you draw. If you find yourself shrugging your shoulders or straining, you’re likely fighting too much draw weight. One of the keys to easy archery learning is easy draw weight!
Finding Your Anchor Point
Your anchor point is like home base for every shot — it needs to be the same place every time.
The perfect anchor combines several reference points you can feel rather than see.
First, you need to have the correct hand position on your handheld release. Rather than making a fist around the release (like a set of brass knuckles), keep the back of your hand flat.
After drawing, your jawbone should rest nicely between the index and middle finger of your release hand. This creates a consistent, repeatable position you can find even with your eyes closed. Consistency here is crucial for accuracy.

Head Position: Stay Proud and Strong
Many new archers try to find their peep sight by moving their head around.
Instead, imagine your head is on a swivel. It can turn left or right, but shouldn’t lean forward or back. Keep your head upright and proud, letting the peep sight come to you. imagine something is holding some hair on the tip of your head. Don’t pull it out my taking your head forward or backwards during the draw cycle. Simply just turn your head like you’re checking your sideview mirror in a car.
Putting It All Together Without Worry
Start by practicing these movements without a bow using a shot trainer or just your hands to get comfortable with the motion. Focus on keeping everything smooth and controlled. When you add the beginner compound bow back into the equation, maintain that same fluid movement.
Remember that proper form isn’t about looking good. It’s about creating a repeatable process you can execute the same way every time. Take your time with each shot, focusing on feeling the correct positions rather than rushing to release an arrow.
Developing a proper draw technique takes time and patience. Focus on making each practice draw as perfect as possible rather than rushing through repetitions. Quality always beats quantity when it comes to building good form.
If you struggle to reach full draw smoothly, you might be fighting too much draw weight. Don’t be afraid to lower the weight initially. It’s better to develop proper form with a lower weight than to ingrain bad habits by struggling with too much weight.
Many new archers also tend to grip the bow tighter as they draw. Remember to keep that bow hand relaxed throughout the draw cycle. Your grip should feel the same at full draw as it did at the start.
Release Technique and Follow-Through: The Key to Accuracy
While your stance, grip, and draw form create your foundation, your release technique determines where your arrow lands.
For anyone starting out with a beginner compound bow, mastering proper release technique can feel overwhelming initially. Let’s break it down into understandable components so you can develop consistency and accuracy.
Understanding Releases
Modern compound bow shooting typically involves a mechanical release. The one you choose impacts your learning curve.
Many new archers start with an index finger release, which feels natural because it operates similarly to pulling a trigger or flicking a light switch. But be careful with that because it can lead to bad habits or trigger anticipation!
We are big fans of tension-activated releases, which work by drawing the bow, anchoring, releasing the safety and then pulling back a little more until it opens with a surprise. When first starting out, what matters most isn’t the type of release you choose — it’s how well you learn to use it. no matter the release, the goal is the game- A SURPRISE that leads to the gold!
The Art of the Release
Think of your release hand as a natural extension of your bow arm. Your hand should remain flat, with the release resting comfortably across your middle knuckles when the fingers are curled.
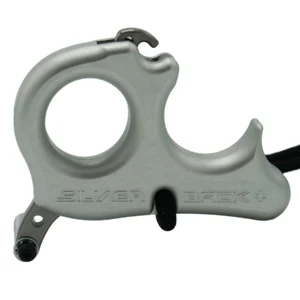
Many new archers make the mistake of gripping their release like brass knuckles, but this creates unnecessary tension that hurts accuracy. With a handheld release like the Silverback or Nock 2 It, aim for about 60-65% of the weight on your index finger; the balance will be on the remaining fingers on the release. Rounding the hand into a fist will hurt accuracy and make the anchor feel inconsistent.
The actual process of releasing an arrow should surprise you. If you’re anticipating the shot or forcing it to happen, you’re likely developing habits that will be difficult to break later. Instead, maintain consistent back tension while smoothly disengaging the safety. Your release hand should stay relaxed throughout the process, allowing the shot to break naturally rather than forcing it.
Mental Game and Shot Execution
Many archers, especially those new to using a beginner compound bow, rush their shots or struggle with target panic. Combat these issues by developing a consistent pre-shot routine. Take your time, focus on your breath, and trust your training. Focus on the PROCESS NOT THE PRIZE!
Think of each shot as a flowing sequence rather than a series of separate actions. Your release should be a natural continuation of your draw and aim, not a distinct action. When everything works together smoothly, you’ll find that your accuracy improves significantly.
In archery, consistency is key to improvement. Whether you’re practicing with a shot trainer or shooting alone, try to make each shot process identical. Document your progress, note what works and what doesn’t, and don’t be afraid to take a step back to basics if you find yourself developing bad habits.
Developing proper technique now sets you up for long-term success in archery. The fundamentals you learn today with your beginner compound bow will be the foundation for all your future advancement in the sport.





 massmonopoly